Translate

Showing posts with label Industrial Piercing. Show all posts

Saturday, May 23, 2015

How to Clean an Industrial Piercing

Hello, everyone!

Since I get most of my hits on my blog from people researching industrial piercings, I decided to go ahead and post a very basic thing that I know I researched a ton before getting mine done: how to clean it.

Of course, I am not a licensed piercer so take my advice at your own risk but I can assure you that I researched this extensively and that I ended up taking an alternative route to the normal.

There are two ways to clean any piercing but with industrials you have to be a little more diligent and careful because they are temperamental piercings. First of all, basics: wash your hands with antibacterial hand soap every time before you clean your ear, preferably one without moisturizers in it because the less additives near your piercing the better. Don't put lotion or oil or anything on your hands until after you're finished cleaning your ear. Don't touch the actual piercing sites. Clean it twice a day (or if that's too much for your piercing like it was for mine, you CAN do it once a day but make sure it gets cleaned AT LEAST ONCE a day). Don't skip a day or a cleaning. Industrials are not piercings you can skip out on cleaning. You WILL feel it if you don't clean it. Don't use alcohol on it. Don't use hydrogen peroxide. Don't use Bactine. Don't use Neosporin. Don't use Triple Antibiotic Cream. All of these will only harm/irritate your piercing and, if you read their instructions, tell you not to use them on puncture wounds. And guess what piercings are: puncture wounds. Also, some people use both of these methods in combination. There's no need to do that. It might just prolong the healing period because you'd probably just dry it out.

SEA SALT SOAK METHOD:

First method is the most accepted, widely recommended, preferred method and that is sea salt soaks. You heat up 8 ounces (one cup) of purified or distilled water (you can use tap water but it's safer to use the aforementioned types, but *cough* I used tap water *cough*) as hot as you can comfortably handle it. You don't want to accidentally burn yourself. Then you add a 1/4 of a teaspoon of NON-IDODIZED SEA SALT to the water and stir it up until it dissolves. DO NOT USE IODIZED TABLE SALT OR EPSOM SALT. Iodized salt and Epsom salt can irritate fresh piercings because of the additives in them. You can buy non-iodized sea salt at the grocery store. They come in inexpensive big tubs of it just like regular salt. However, they can be annoying because sea salt sticks together so you might have to knock it up against something to free up the salt particles every once in a while.

(off brands/generic brands are fine, just make sure it's non-iodized sea salt)

Anyway, after your salt is all dissolved, just submerge your ear into the cup of water. I found this easiest to do by sitting in a chair at my kitchen table with my cup of water on the table and hunching over to submerge my ear. Keep your ear in the sea salt water for FIVE TO TEN MINUTES. This can be a bit of trial and error. You'll be able to tell over time how long you should keep your ear in the solution. IT'S RECOMMENDED THAT YOU DO THIS METHOD TWICE A DAY, once in the morning, once at night. And make sure to RINSE your ear with warm, clean water after you're finished soaking it. If you don't, the sea salt can start to build up around the piercing sites and irritate them. When you're finished rinsing it, take a piece of paper towel and gently pat it dry. Don't use a regular towel. Regular towels can harbor bacteria and can cause an infection, especially in the beginning when your piercing is so susceptible. You can also dip in cotton pads/balls in the salt water solution and press them against your piercing sites, replacing them as the water cools on your ear, for five to ten minutes. However, it is MUCH more beneficial to submerge your ear than to do this.

The warm sea salt solution method helps to draw out impurities in your piercing as well as clean the lymph out that develops as a result of your piercing healing. It also helps soften the "crusties" (dried lymph) that develop as your piercing heals. When you first get the piercing, it will be excruciating to move the bar even a little. Simply soaking your piercing for the first week twice a day should be fine. However, if you start to develop the aforementioned crusties (usually crusties don't develop til after a week of healing time), you need to clean them off and clear them away from the piercing sites; otherwise they can cause you to develop an infection. As your piercing heals and crusties develop, soak your ear first; then take a q-tip, dip it into the sea salt solution and use it to clean the crusties off. Try not to move your bar too much because, first of all, it will hurt A LOT in the beginning stages of healing; and, second of all, because you can accidentally drag the crusties into your piercing which will, again, lead to infection. Crusties are perfectly normal. They're even good. They show that you are healing because they are the result of your body naturally healing itself from the inside and pushing out dead skin cells, etc. from the healing process. If however, you don't develop many crusties, don't be alarmed. Your piercing is more than likely still healing, it just doesn't develop as much lymph as other people's do. IT IS NOT NECESSARY TO MOVE/TWIST YOUR BAR. The myth that your skin will heal to the bar if you don't twist it is exactly that: a myth. It's impossible for your skin to heal to the bar. And you will be doing more damage than good. Twisting/moving the bar will only irritate your piercing and can damage your fistulas (the healing piercing hole), prolonging the healing process. Your barbell will get moved because life is life but don't purposely move it around. As your piercing heals, you can move it up and down as little as possible in order to clear away the crusties but, like I said, do it as little as possible. And as you do it, keep in mind the way it's moving and try to clean the crusties that would get dragged into the piercing first before moving it to get to the rest. EXAMPLE: If you are going to push it UP, clean the inner holes first, then the bottom, then do the one on the top so they aren't being dragged through the piercing holes.

There are also sea salt sprays, such as H2Ocean, that you can purchase for your piercings. These are marketed as sea salt soaks in a bottle basically. They have added ingredients that can help speed up the process and encourage healing. These can usually be purchased through your piercer or a piercing shop or on the Internet where there is everything.

I WOULD NOT RECOMMEND USING A SEA SALT SPRAY AS YOUR MAIN METHOD OF CLEANING AN INDUSTRIAL PIERCING. Sea salt sprays can be helpful and I think they are great for piercings that are difficult to submerge, such as a lip piercing. But they have their limitations on something like an industrial. They can only clear away crusties, not draw out impurities in your piercing like a warm salt water solution can. Sea salt sprays are good for in between cleaning if you need it, but I definitely wouldn't use it as your regular twice a day cleaning method for an industrial.

MY EXPERIENCE WITH THE SEA SALT SOAK METHOD AND SEA SALT SPRAYS:

I hated the sea salt soak method. My body didn't like it. At all. It dried my piercing out. My piercing was constantly irritated. It prolonged my initial healing period. It just wasn't for me. I personally sea salt soaked my piercing twice a day for the first week and a half after getting it done. After that, I cut it down to once a day (only at night) because my piercing was feeling irritated and becoming dried out. I was actually developing dry skin on my ear from it and I naturally already have dry skin and live in a desert so it didn't do me many favors. I still stuck with the sea salt soak method for a month and a half to two months (I don't remember; it's been nearly two years now) before I switched to the second method of cleaning piercings. I tried using less sea salt (although 1/4 teaspoon to 8 ounces of water is the best ratio to make sure it gets clean) to try to curtail the dry skin but nothing worked. I didn't know this at the time, but you can use jojoba oil on the dry skin to help moisturize it. Of course, make sure not to get it into the healing piercing because duh. THE SEA SALT METHOD IS THE BEST METHOD TO USE. Most everyone has amazing results of using SSS but for some people, like me, it just doesn't work well. I would still recommend and deeply encourage using the SSS method for at least a month of your initial healing period and for the entire healing period if your body responds well to it. If however, you are like me and develop dry skin or if your piercing is consistently irritated, you may want to try the second method.

As far as sea salt sprays go, I don't like them either for ear piercings or really any piercing. I just don't like them. The spray goes everywhere if you try to spray it directly on the piercing (it's marketed to say that the spray comes out fast enough to clear away anything inside your piercing but meh) and it's difficult to control how much product comes out. Spraying it onto a q-tip then using it on your ear is okay, but I just didn't care for it personally.

ANTIBACTERIAL SOAP METHOD:

All right. Lots of people don't like this method. Say it's very bad for piercings, etc. But this is my preferred method and definitely worth trying if sea salt soaks don't work for you just like they didn't for me. For many piercing places, this is even the recommended method given by them but once again I would definitely encourage you to try sea salt soaks before going to this.

For this method, you use antibacterial soap and q-tips to clean the piercing. DO NOT USE HAND SOAP. I don't know why people use hand soap but just don't. Buy the DIAL GOLD BAR SOAP. The gold bar soap has little to no moisturizers in it so it is less likely to irritate your piercing.


Firstly, use warm, wet q-tips to wet the four piercing sites on your ear. Take a q-tip and rub it on the bar soap. Then use the q-tip to clean around the piercing hole. I would definitely recommend to err on the side of caution and don't use the same q-tip for all four piercing sites. If one of the holes is becoming infected, you could accidentally transfer the infection to the other piercing sites by contamination. I personally just used one end of the q-tip per piercing hole so I would use one end for the inside top hole, then flip it to the other end and clean the outside top hole, etc. Also, using a new end of the q-tip for each piercing site will prevent you contaminating the bar soap by repeatedly rubbing used soap onto the bar. After you're done cleaning around the holes, use clean wet q-tips to clean all of the soap off. It's important to make sure you get all of the soap because it can irritate your piercings and, once again, lead to an infection, or, even more likely, lead to hypertrophic scarring. DO NOT PURPOSELY GET THE SOAP INTO THE PIERCING. LOTS of uneducated people say that you need to get the soap into the piercing in order to clean it. Don't do that. Getting soap into the piercing will only irritate it (you might as well call hypertrophic scarring your new best friend) and there is NO NEED to get it into the piercing. Your body naturally is cleaning the piercing on the inside. Removing this debris (crusties) due to its cleaning/healing process is all you need to do. Let your body take care of the inside on its own. You can clean your piercing using this method twice a day as well; however, I only did it once a day because my piercing was happier that way. Listen to your body.

My piercing was MUCH happier after I switched to this method. It stopped being irritated IMMEDIATELY. It felt so so so much better. It also healed very quickly after I switched to this. It still took the entire six months for the initial healing but it would've been much longer if I had stuck with SSS because of the irritation SSS gave me. I never got any hypertrophic scarring or had any complications with my piercing.

And I think that's about it! I might do a post later on hypertrophic scarring vs. keloids (people drive me crazy about getting those two mixed up), and how to treat hypertrophic scarring (keloids are practically untreatable).




Monday, May 12, 2014

Final Update on My Industrial Piercing

My industrial piercing has now been healed over 6 months. A few days after the 6 month mark, I went ahead and changed it. Six months is the MINIMUM amount of time you need to wait before you change your industrial. If you change it sooner, you are MUCH MORE LIKELY to develop hypertrophic scarring (cartilage bumps) and infection because the fistula (hole in your cartilage) is not healed enough and is too fragile for you to change it. So just don't, okay? I know how tempting it is to change the jewelry to something you like better, but you will probably regret it.

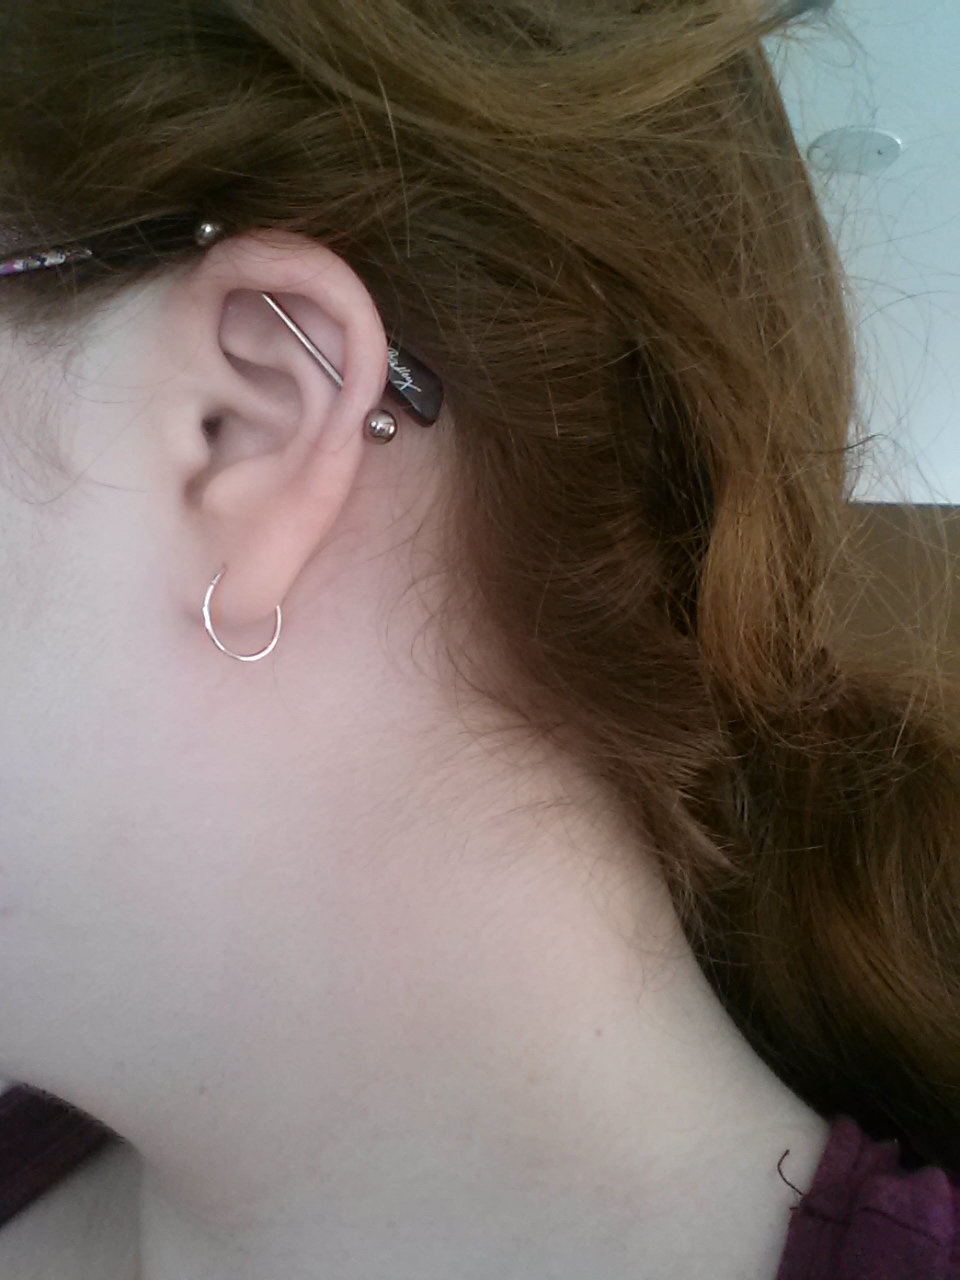
Here is a picture of what mine looks like currently:

 
If you want to see what it looked like previously, just look at my previous two posts on this blog.

 
I changed my bar myself. When changing your bar, make sure you clean your ear before you remove the bar you were pierced with. Make sure to clean the new jewelry (both bar and balls) with alcohol before you put the new bar in. And wash your hands with antibacterial soap because duh.
Anyway, when I changed mine, I did all of the above. Then I unscrewed the bottom ball on my initial bar and pulled it all the way through my ear through the top. Don't do this if you can prevent it but I couldn't get my top ball off so I ended up having to pull it through. Pulling it through however can lead to infection possibly and it can also tear your piercing if you have externally threaded jewelry in it (which I did). If you pull it through, make sure to be extremely gentle. After I had the bar out, I quickly swiped the four entry points of my piercing holes with some alcohol on a cotton swab. After that, I put my new bar in. I first put the top part of the bar in and then put the bottom part of the bar so that I didn't put it through both holes. Then I just screwed the balls on and that was it.
In case you don't know, externally threaded barbells have the screw/threading part on the actual bar itself so that you screw the ball onto the bar. Internally threaded means that the ball has the screw/threading and you screw the ball into the bar. Internally threaded is nicer on your piercings because there is no screw part having to go through your piercing which can cause small tears in the fistula. Most cheaper jewelry will be externally threaded so internally threaded may cost more so just be aware of that.
 
The bar I was pierced with was a 14 g 1 1/4 (32 mm) surgical stainless steel externally threaded barbell.
My new bar (the one in the picture) is a purple 14g 1 5/16 (34mm) titanium internally threaded barbell. Both bars have 5 mm balls on them. 
 
It took me a while to find a 14g titanium internally threaded barbell so I will link where I purchased mine from right here:
I've had this barbell in for over a month and have had no problems with the quality.
Another benefit of where I purchased mine from is that they give you options for every single length and have multiple colors.
I purchased the size with an added 2mm to the one I already had in because I wanted to give myself just a bit more room. Most piercing places will use a barbell either 1 1/4'' or 1 1/2'' so yours is probably one of the two. I trust you can estimate it for yourself but if need be, you can hold a ruler up against your ear and measure. THE LENGTH OF THE BAR IS THE MEASUREMENT BETWEEN THE BALLS so do not include the balls when measuring it. It really comes down to preference on length of bars but don't purchase one too small or too big obviously. If you purchase one too small, it won't be long enough to span your ear. If you purchase one too big, it will be easily caught on things (like your hair) which can easily damage your piercing or even rip it out of your ear (there are people stupid enough to walk around with too long of bars and had them ripped from their ear, it's on youtube, check it out).
 
Surgical stainless steel is okay for piercings however it does contain nickel. If you know that you have a nickel allergy or you are sensitive to nickel, you may want to change to titanium which contains little to no nickel. Titanium is also a higher quality metal and it is also able to be anodized (shocked with electricity) to be different colors so instead of just having a barbell that is plated with a different color, you can have a titanium bar that is that color through and through (although it may dull over time).
I had absolutely no issues with my piercing the whole time I've had it. I never developed any hypertrophic scarring. Mine didn't even crust very much at all the entire healing period which honestly kind of worried me and made me think it wasn't healing but just by how it felt I knew it was. I still don't sleep on mine but that's mostly because I've always been one to sleep only on one side anyway which isn't the side I put my industrial on. I would still wait to try to sleep on your industrial for at least a year when it's about as fully healed as it's going to get. Lastly, my ear does get sore from time to time if I accidentally hit my bar with my hair brush or something but the soreness clears up within a few days and it's back to normal.
 
 
Overall, I am still extremely happy with my piercing and absolutely love it. I have no plans for the future to take it out but I know eventually I probably will have to. If you have any questions, leave them in the comments. I'd be happy to help. I also have anons on so you can ask me without having to make an account. Happy piercings, my people! 

Friday, October 25, 2013

Update on My Industrial Piercing

Hello!

So it's been a little over two months since I got my industrial piercing. I got it pierced on August 15, 2013 and today is October 25, 2013.

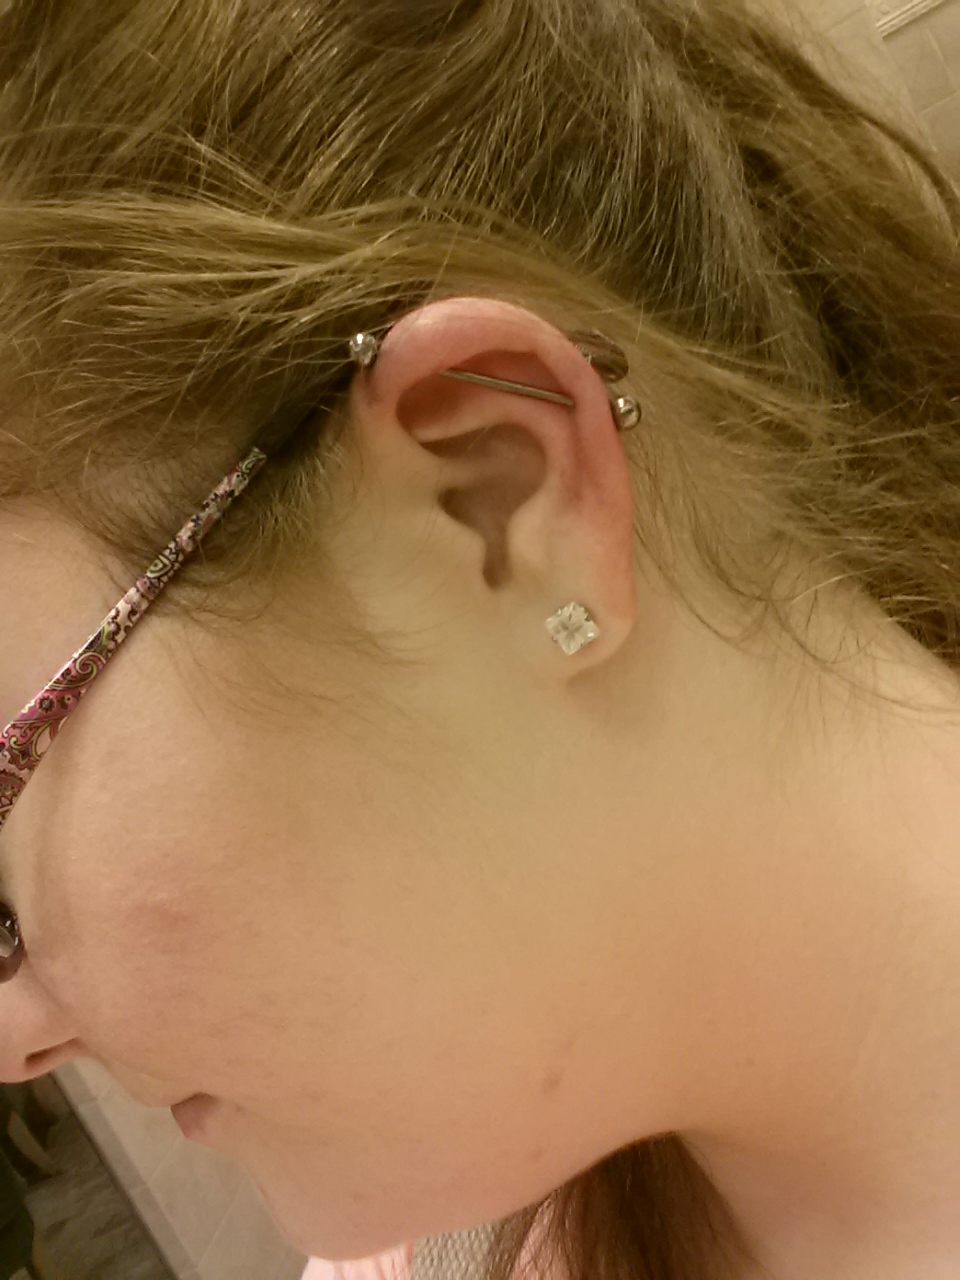
Here is a picture of what it looks like currently:


So quick update. It feels much better now that it's been healed for two months. I've finally found a cleaning method that I like which has definitely helped it heal much easier. It hasn't gotten infected and I've had absolutely no hypertrophic scarring or keloids. It's still sore when I clean it but that is not unusual since industrial piercings take at least six months, most of the time eight months to a year, to fully heal.
In the first month, it felt irritated quite often and I think it was mostly due to the cleaning process I was using then. I have since switched it up and within a couple days, my ear felt much better, not irritated at all, and it has since healed much quicker. During the first month, it would still bleed a little when I was cleaning it and it was far more sore. It doesn't bleed at all now, even when I accidentally hit it, and you can tell that it is healing just by looking at it. This is usual as well because piercings heal from the outside in.
 
Just a few tips from what I've experienced:
1. Try your best not to sleep on it. If you are a side sleeper, try to get it pierced on the side that you don't sleep on. If you do tend to roll around though, try to make sure that you change your pillowcases often so that there is less chance of bacteria getting into your piercing due to your pillowcase. If you do sleep on it, it will take longer to heal because of the pressure you're putting on it and you are more susceptible to hypertrophic scarring.
2. Make sure you go to a really good, experienced piercer. Industrials are not easy things to take care of and maintain. And if you get it pierced by an inexperienced piercer, you are even more likely to have issues with them. The holes must be perfectly lined up in order to prevent strain on your cartilage. Not only will it slow down your healing process, it can also cause damage to your ear. Even if you cannot feel it, your ear may still be strained if the piercings are not lined up properly. This leads to hypertrophic scarring. So go to a good piercer. And good piercers aren't cheap. Just saying.
3. Keep your hair away from it as much as possible. I kept my hair tied up for the first month every single day. Now that it's healed more, I let it down once in a while but I can still feel the difference with my hair down and sometimes my piercing will feel irritated from it.
4. Don't slack on your cleaning. That's how you get infections. Clean it twice a day, don't skip out on it, especially with an industrial piercing. Make sure you wash your hands with antibacterial soap before touching your piercing and only touch your piercing if you're cleaning it. And, for the love of everything, DON'T touch the actual piercing sites. Just the jewelry. Remember, q-tips are your friends.
 
 
Okay, moving on. I would really like to change it but I will wait the suggested minimum six months because it's suggested because it's a good idea. So the barbell I was pierced with is the one I still have in. I know I don't have much to say but when I was researching getting this piercing, there wasn't much information put up by people in the healing process. They either had just gotten it pierced or it was already fully healed so I just wanted to be helpful.
 
 
And that's pretty much it! Let me know in the comments/on Twitter (@killjoygrl) if you would want me to post how I clean it. 
 

Tuesday, August 20, 2013

My Industrial Piercing

Hello all!

A few days ago (August 15, 2013), I got an industrial piercing done on my left ear. I'd wanted it for years now and after researching it deeply, I decided to go ahead and get it done. Now, industrials are not something to lightly do. They take an extremely long time to heal (minimum is 6 months, more than likely you'll be babying it for a year or more). They're prone to hypertrophic scarring (bumps will form on the two piercing sites) if you're not careful and even if you are careful they may still form. But I absolutely love it.

Getting It Done:
I researched on the internet the best piercing places in my city and chose one with the best reviews. It cost me $80 including the jewelry (not including tip).
The pain wasn't bad at all for me. But it varies from person to person. The vast majority of people say it hurts extremely badly. For me, it hurt maybe a 3 out of 10. However, I do have a high tolerance of pain which I managed to discover when dealing with gallbladder attacks for over a year and having a surgery to remove my gallbladder. In all honesty, having an IV put into my wrist hurt more than the piercing did.
Process: He marked where he would pierce it. He didn't have me check it or anything which I didn't mind because I love exactly where he put it much more than where I had in mind. Then he put clamps on the top area and pierced it with a hollow needle. Most piercers will do a 1, 2, 3 breathe thing then pierce it, however he did not with me which also didn't bother me. After piercing it, he put a cork in the bottom of the needle. He then threaded (put in) the jewelry with one of the balls already screwed on the end (the top) and none on the bottom. He then checked the placement before he pierced the bottom hole. He put clamps on the bottom and pierced it. Finally he threaded the jewelry through the bottom and put a ball on the bottom of the bar. And it was done!

Photo Timeline:
I decided to take pictures of it daily on my phone so I'd be able to compare the pictures and more easily see if I develop an infection and to monitor its healing. So I'm gonna do a post here and show some of my pictures for people who are thinking of getting it done and for people to know what to expect.

This is about an hour after getting it done on August 15, 2013. As you can see, it has redness but it hadn't swelled at all.
 
The morning after getting it done. As you can see, it's still red and it has swelled. August 16, 2013.
 
Morning two days after getting it done. Redness and swelling has decreased. August 17, 2013.
 
Here I'm just showing what it looks like after showering. Don't be alarmed if your piercing swells a bit after showering and has redness. It's totally normal.


Morning of August 18, 2013.
 
August 19, 2013. Pretty much no swelling or redness.
 
 
Let me know in the comments or tweet me @KilljoyGrl if you have any questions or want to see a post on taking care of it or my progress or anything. Hope this helps!